In this Article
- How to Use This Rigging Guide
- Build the Deck Map Before Adding Gear
- Lake Layout: Stable Storage for Wind, Depth, and Long Drifts
- River Layout: Low Snag Profile for Current, Gravel Bars, and Portages
- Flats Layout: Quiet, Minimal Rigging for Sight-Fishing and Long Casts
- What Earns Deck Space: Rods, Crates, Coolers, and Tackle
- Anchors, Leashes, and Emergency Access Are Part of the Rig
- Scope, Limits, and the Launch-Day Test
How to Use This Rigging Guide
The same angler should not rig the same inflatable SUP the same way for every trip. Water conditions dictate deck logistics. A setup that feels perfectly organized on a calm lake often becomes a liability on a moving river or a noisy distraction on shallow flats.
This guide separates paddleboard rigging into three distinct layout families. The lake layout accommodates more rear storage tolerance. River layout prioritizes a low-snag and quick-carry profile. The flats layout maintains an open casting deck for line management. This is an educational framework for recreational inflatable SUP anglers, not a product ranking or a universal rig diagram.
The core layout goal remains operational across all environments. The paddler must be able to stand, kneel, paddle on both sides, reach pliers or a line cutter, and remount without stepping into loose line, hooks, anchor rope, or a loose crate strap.
Build the Deck Map Before Adding Gear
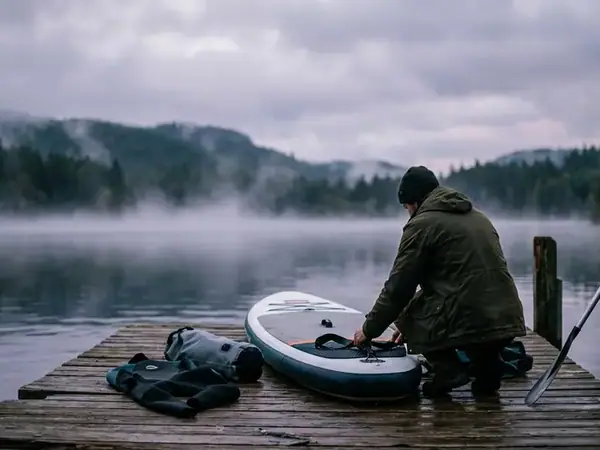
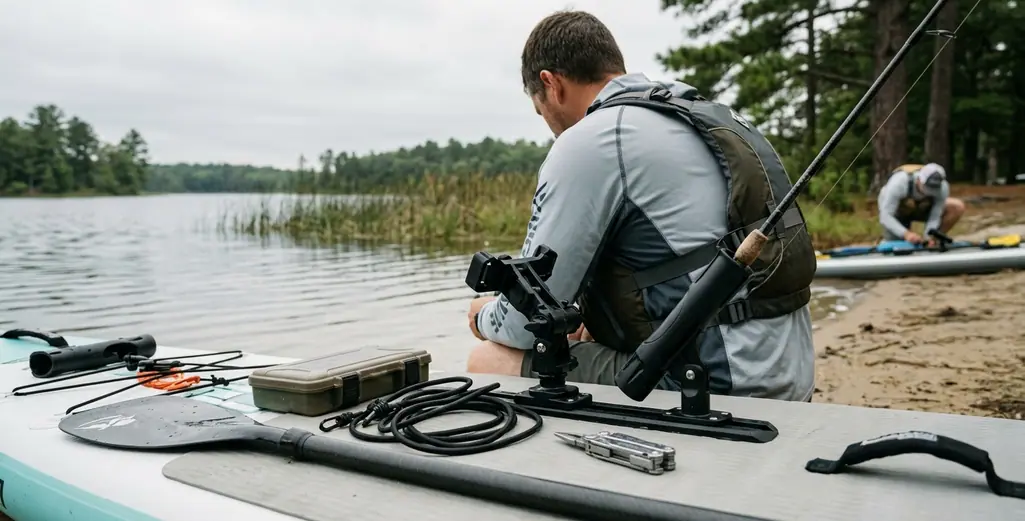
Effective load distribution starts on land. Inflate the board to its normal operating pressure, gather the planned gear, and run a 6- to 10-minute dry test before heading to the launch ramp.

Divide the board into five working zones. Standing area centers around the carry handle. The forward access area sits near the front bungees. Rear storage occupies the space behind the stance. Rail attachment points run along the sides. Finally, the emergency-access zone must remain reachable from standing, kneeling, or sitting positions.
Execute the dry test by performing two mock casts on each side, one kneeling transition, one reach for pliers, one tackle-tray opening, and one paddle recovery movement. Keep heavy items low and near the centerline. Avoid stacking a hard cooler on top of a crate behind the paddler. The added height catches wind and makes remounts clumsy.
In practice, checking bow trim before launch prevents poor tracking on the water. Lift the nose and tail a few inches on land. A bow that feels overloaded before entering the water usually tracks worse once wind or chop is added.
Lake Layout: Stable Storage for Wind, Depth, and Long Drifts
How much gear can a lake setup handle? It is the most storage-tolerant setup, but that capacity does not justify overloading the SUP. Lake fishing often allows slower movement, longer drifts, and more room for a crate or soft cooler.
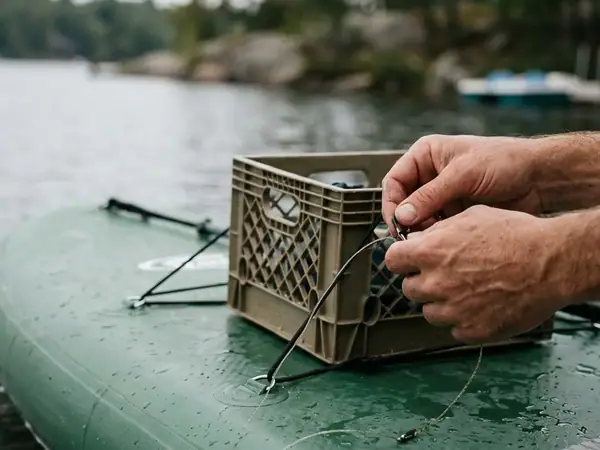
Place a low crate or soft tackle bag behind the standing zone. Position it close enough to reach while kneeling but far enough back that your heels do not hit it during a stance adjustment. Angle rear rod holders outward and slightly aft. This keeps rod tips away from the casting stroke and the paddle blade. Vertical rods are more likely to catch wind or interfere with a backward step.
Use a forward dry bag only for soft items such as rain gear, a spare layer, a compact first-aid kit, or lunch. Avoid putting the densest tackle box on the bow. Keep anchor or drift-control gear completely separate from loose fishing line.
Quiet the deck before launching. Clip your pliers, close all tackle lids, bungee the dry bag, and check that no hard box can knock against the deck pad during small chop. A cooler that is useful for food or harvested fish on a calm lake can become a kneeling obstacle when the angler has to remount from the rear of an inflatable SUP.
River Layout: Low Snag Profile for Current, Gravel Bars, and Portages
The river section requires an intentionally conservative approach—escape and recovery dictate the layout, not fishing efficiency. Current, strainers, shallow riffles, and frequent stepping on and off the board increase the consequences of a cluttered deck.
Recommend one primary rod and, at most, one backup rod stored low if the route includes shallow riffles, overhanging branches, or frequent bank exits. Skip tall rear crates on sections where you expect to duck under limbs, drag over gravel bars, or carry the inflated board more than a short bank-to-water distance.
A lake rig with a rear crate and two rods may feel organized on open water but become a snag hazard on a river section with low branches and gravel-bar portages. Keep a line cutter or knife reachable on the PFD or upper deck area, not inside a tackle bag. The paddle must remain recoverable without stepping over anchor rope or rod leashes.
Anchor rope in moving water cannot be treated like lake anchor rope. Any rope used around current needs to be short, controlled, and kept away from feet, hooks, and leash hardware.
Risk Factor: If the board cannot be cleared, lifted, carried, or remounted quickly with the rig loaded, the river setup is too complicated.
Flats Layout: Quiet, Minimal Rigging for Sight-Fishing and Long Casts
Picture a fly line catching on a loose crate strap just as a fish approaches. The flats layout shapes around clean line movement and quiet boat-like positioning. The rig should feel sparse on purpose. Anything that catches fly line, taps against the deck, flashes in clear water, or blocks the paddler’s vision degrades the setup.
Keep the primary standing area completely open from the carry-handle zone through the front footwork path. Exposed bungees, crate corners, rod-holder bases, and loose straps act as common line catch points.
Use one small soft tackle bag or low-profile box placed outside the line path. Secure it either forward under controlled bungee tension or aft behind the stance. For fly line, avoid upright rod holders, open carabiners, loose tool coils, and box latches near the stripping area.
A stakeout pole concept that makes sense on firm shallow flats can be inappropriate on soft bottom, deeper water, strong wind, or protected habitat. Run stealth checks before launch: ensure no swinging pliers, no hard box sliding on the deck pad, no metal clip tapping the rail, and no spare rod tip crossing the casting lane.
What Earns Deck Space: Rods, Crates, Coolers, and Tackle
What actually deserves a spot on the board? Organize this decision as a deck-space audit. Apply a strict hierarchy: safety equipment first, paddle access second, fishing tools third, and comfort items last.
Each added rod adds another tip, guide train, lure, and holder to protect during remounts, bank exits, transport, and paddle strokes. More rods increase fishing options but simultaneously increase snag points and wind profile.
Crates organize hard tackle trays and rod holders efficiently. However, they raise the snag profile and can make rear remounts harder if mounted tall or overloaded. Soft bags do not organize vertical rod storage as cleanly, but they offer distinct logistical advantages.
Recommendation: Soft bags are quieter and lower than crates, making them easier to shift forward or aft during a land test.
Coolers provide practical storage for drinks, food, or legally harvested fish. They also add a hard kneeling obstacle and can make the rear deck feel crowded when the angler turns to land a fish. Apply a simple rule: if an item cannot be secured, reached safely, or justified for that specific lake, river, or flats scenario, leave it off the SUP.
Anchors, Leashes, and Emergency Access Are Part of the Rig
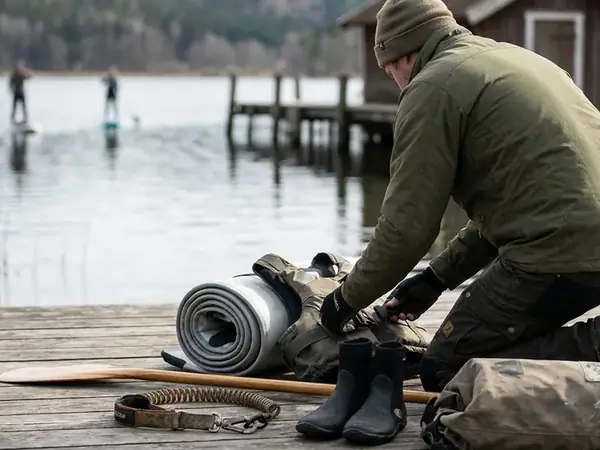
Safety gear forms the foundation of the rigging layout, not an afterthought stored under tackle. Treat this phase as the safety layout pass after drafting the fishing layout. Require proof that the PFD, whistle, cutter, phone, and paddle are accessible before adding the first lure.
The U.S. Coast Guard paddlecraft safety guidance provides broad orientation for PFD use, signaling, and preparation. State, provincial, and local rules may be stricter or different.
Separate positioning systems by water type. Use small lake anchors or drift socks for still-water control. Exercise extreme caution with any rope in current. Reserve stakeout-style concepts only for suitable shallow flats. These systems are not interchangeable.
Emergency-access placement must be reachable from more than one body position. A phone or radio belongs in a waterproof case or pouch secured to the paddler or board, not buried beneath tackle trays in a rear crate. The paddle recovery plan should be visible in the rig itself, whether through a paddle leash, a spare clip, or a habit of parking the paddle under a deck bungee where it cannot slide under loose line.
Scope, Limits, and the Launch-Day Test
Rigging theories fail when they meet actual water conditions. Close the preparation phase with a practical launch-day routine that exposes bad rigging before the board leaves the bank.
Run the final launch test sequence on a flat shoreline, dock edge, driveway, or campsite pad. Fully inflate the board and load the actual gear. Stand in your normal stance, kneel once, cast in both directions, reach your pliers or cutter, and reach your PFD whistle. Finally, lift the loaded board by the carry handle. Remove any item that fails this sequence. The test usually takes not far from 8 to 12 minutes once the gear is gathered.
This framework applies specifically to recreational inflatable SUP fishing on moderate lakes, manageable rivers, and shallow flats. It excludes offshore paddling, whitewater, night fishing, expedition travel, cold-water immersion planning, and technical rescue scenarios. Board width, angler size, wind, current, water temperature, fish species, and local regulations can all change which layout is safest.
Key point: Unnecessary gear removed during the launch test directly translates to fewer obstacles during an unexpected remount.
Launch-Day SUP Fishing Rig Check
- Inflate the board fully before judging gear placement.
- Stand in normal fishing stance without touching crate, cooler, straps, or rod holders.
- Paddle on both sides and confirm the blade does not hit rods or loose tools.
- Make sure emergency tools remain reachable from standing, kneeling, or sitting.